Set up your workflow
Taking great photos is all well and good, but it doesn't mean that much if you lack the ability to find photos in a meaningful way after the fact. The workflow I'm going to show you is all about keeping things organized and making sure you can find them, even years later.
If you follow this workflow step by step, every image you take will have a name that has the
following information embedded in it: a four-digit number that indicates the image's place in a sequence taken in the same shoot; an abbreviated shoot name so you have some sense of what it might be an image of; the date the image was taken, in an YYMMDD format.
We'll be setting up a folder structure in which every year gets its own folder. Within that folder will be folders for every shoot you go on in that year.
Each shoot in a given year will show up in chronological order
Each image file will appear in a subfolder of the correct shoot folder in the order in which it was taken, numbered in sequence.
With all that information at your fingertips, finding a specific image becomes a matter of seconds, rather than a frustrating search through a jumbled album of images.
The above might not make much sense yet, but we're going to walk through it step by step.
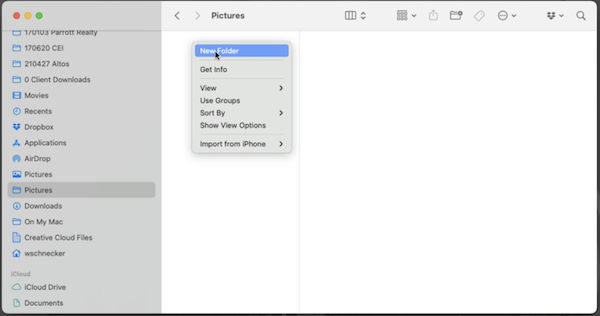
To begin, find the Pictures folder on your computer. Right click on it, and select New Folder.
Create a folder that will hold all the shoot folders for the current year.
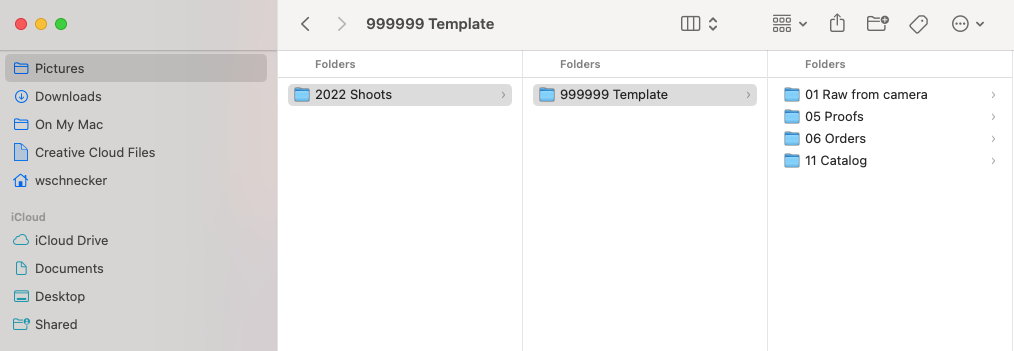
In the current year folder, we'll make a template structure that can be replicated for each new shoot. The new folder needs a name. I usually name it 999999 Template. (The 999999 acts as a placeholder for the shoot date in yymmdd format.)
Within the template folder, create the following new folders:
01 Raw from camera - All the files get imported from camera for a particular shoot will end up here. (We'll talk about importing images properly in the next lesson.)
05 Proofs - This folder will be for images you may share digitally, through email or posts to social media, etc.
06 Orders - This folder will be for images that you want to order prints of, whether for your own use or for paid client work, if you do that.
11 Catalog - This folder is where your Lightroom catalog will live; this is the folder where Lightroom will store imported images and keep track of any changes made to them as you edit.
You may wonder why there are gaps in the numbering of these folders. It's because this system is built for redundancy. In the workflow I use in my professional studio, I have other folders I use that the average hobbyist, or even semi-professional, won't need. However, you may find that you do want to add folders to your workflow, and by leaving gaps, you leave yourself space to add to the template without reordering and reorganizing all the folders. Leaving some gaps makes your system "future proof." To get started with the basic process, though, these four folders will serve you well.
Now that you have a workable file structure, you can open Lightroom.
Make sure you have the most up to date version of Lightroom. In the tool bar at the top of your computer screen, you'll see the icon for Adobe Creative Cloud. Clicking on that will bring you to Adobe, where you can download and install the apps available with the Creative Cloud plan you've chosen.
For our purposes in this course, we're only talking about Lightroom. You want to download and install Lightroom Classic.

Lightroom Classic stores your files locally, on your computer, whereas as the cloud-based Lightroom - the Lr icon without the C - stores your image files in the cloud. You can do that, of course, but I recommend Lightroom Classic because I like the control of knowing exactly where my images are stored. I also prefer the speed of local storage that you lose when images have to move in and out of the cloud and sync before they can be worked on. There is a cost associated with cloud-based storage, too, that can become significant if you have a large number of images, as I do.
Once you've installed Lightroom Classic, you can open the app on your computer.
At first glance, you'll see that the Lightroom window has four sections.
The left pane displays a thumbnail of the image you have selected and provides some information about its place in the catalog.
The center pane displays the image you have selected.
The right pane contains the controls you'll use to manage your images.
Finally, the filmstrip along the bottom displays thumbnails of all the images in the catalog, and you can scroll through it to find the image you want to work with.
We'll get into all of that in a later lesson, but for now, we'll do some one-time work to make sure your images stay organized. Your camera names each image it takes, usually with something like "DSCR" followed by a sequential image number. That's fine as far as it goes, but it doesn't give you very much meaningful information to help you remember and retrieve the image later on. When we import images from the camera into a Lightroom catalog, we want meaningful filenames that tell us a bit more about what the image is of and where we can find it.
In Lightroom, select File from the menu bar at the top of the Lightroom window.
Scroll to Auto Import.
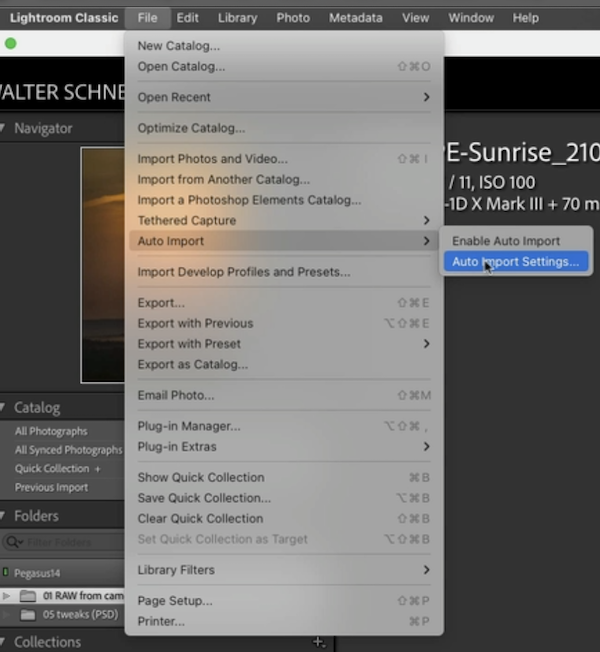
On the pop-out menu, click on Auto Import Settings. This will open a new window with the title Auto Import Settings at the top. In this window, you'll see a panel for File Naming. Click on the blue up/down arrow icon next to the words File Naming, and on the menu that appears, scroll to and click on Edit.
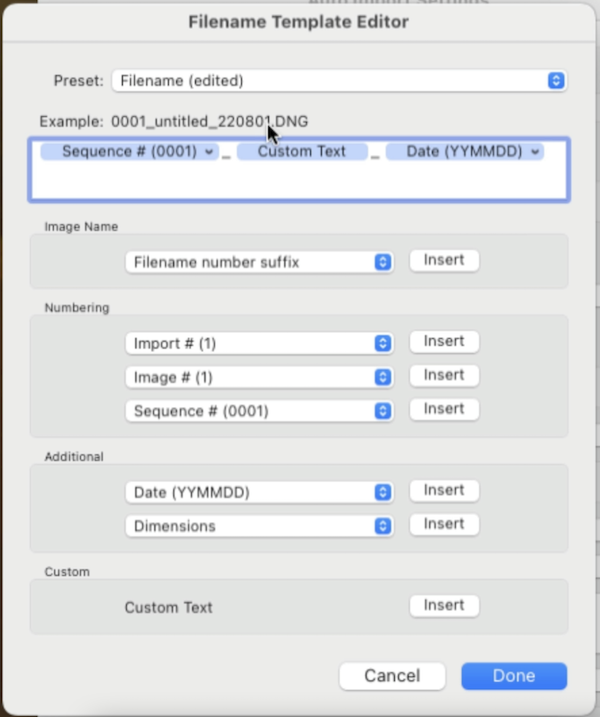
That will bring up the Filename Template Editor, where you will create a template to rename imported images with the naming convention we talked about at the beginning of this lesson. This is the backbone of your file organization that will enable you to find any image quickly.

The first part of the filename should be Numbering. Choose the option that says "Sequence #" and make sure to choose the option that gives you four digits to work with. Click the Insert button.

You should see a blue bar with "Sequence # (0001)" appear in the box at the top of the template editor window. Type an underscore after that blue bar. At the bottom of the template editor window, find Custom Text and click the Insert button. A blue bar with "Custom Text" on it will appear next to your underscore. Type an underscore after that blue bar. Lastly, under the Additional panel, choose Date (YYMMDD) and click the Insert button.
Now, you need to save this template. At the top of the Filename Template Editor, click on the blue up/down arrow in the bar next to the word Preset. In the pop-up menu that opens, scroll to and click on Save Current Settings as New Preset.

This will open a small window called New Preset, where you can give your present a name. I suggest "my filenaming," or something like that. Click the Create button in the bottom right corner of the New Preset window, and you're done!
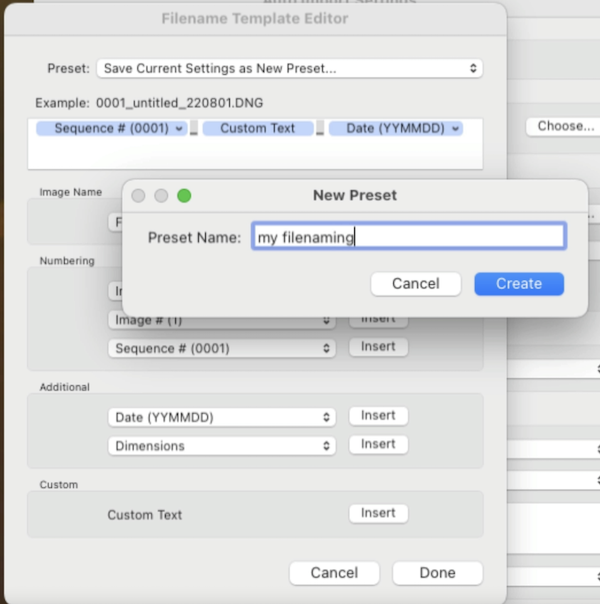
(Well, as soon as you click the Done button in the bottom right corner of the Filename Template Editor.)
With the file structure you've created on your hard drive and the naming template you've created in Lightroom, you now have the tools you need to be able to find any image anytime in a matter of seconds. Awesome!
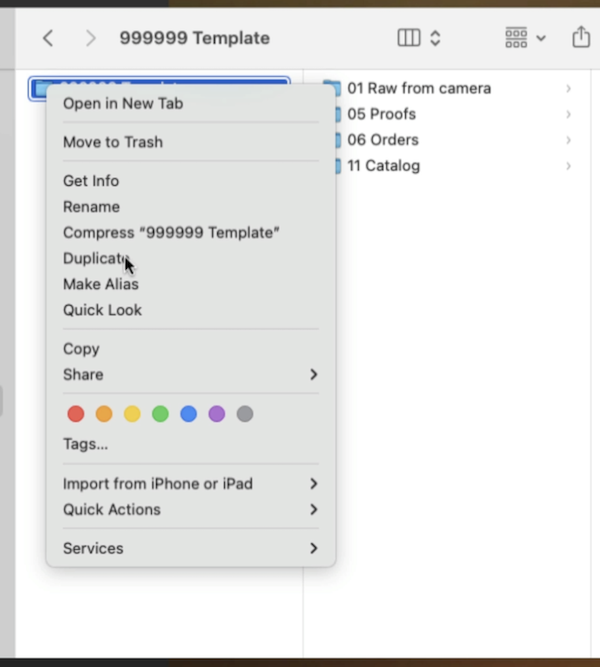
Now, when you come back from a shoot, go to your Pictures folder, choose the folder that contains your current year shoots, right click on the 999999 Template folder and scroll to Duplicate on the pop-up menu that appears.
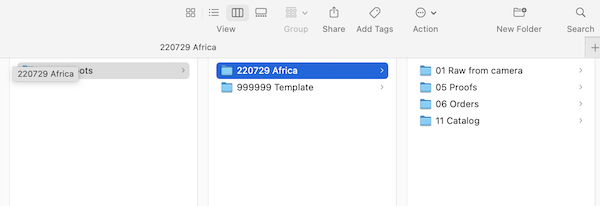
Click on the title of the new folder you just created, 999999 Template copy, and rename the folder with the correct shoot date in YYMMDD format and an appropriate title.
These folders may be empty now, but they are the framework that your photo organization will hang on. Next lesson, we'll talk about how to get images from your camera into these folders in a clean way that will make them easy to retrieve and work with as you wish.